Inspiration
There are many tutorials out there on splitting a Windows dual boot onto two different drives, or moving a Linux/Windows dual boot to a different drive. Sadly, my specific dual boot scenario was not easily found and therefore I decided to make this blog post for my own personal notes in case I would need to ever do this again. To finish off, I will include a quick comparisson using CrystalDiskMark to show the improvement in read and write speeds that this migration has resulted in.
Process
Scenario:
- Current Setup:
- 1 TB HDD w/ 4 partitions
- Windows Recovery Partition
- Windows OS
- Windows Recovery Partition
- Ubuntu OS
- 1 TB HDD w/ 4 partitions
- Wanted Final Product:
- 1 TB HDD w/ 4 partitions
- Games & Other Programs
- File Data
- Shared Data
- Ubuntu OS
- 512 GB M.2 NVME SSD w/ 1 paritition
- Windows OS
- (Windows installation will add other recovery partitions)
- 1 TB HDD w/ 4 partitions
Scowering the Internet, I have found three different ways that this can be done:
- Create a Recovery Drive & install Windows 10 through the recovery drive on the new SSD.
- this will transfer over your activation license.
- can then clean up file structure further.
- Create a installation USB & install Windows on the new drive.
- this will transfer over your activation license.
- can then transfer any files over.
- Clone C: partition over to the SSD.
- this will transfer over activation license.
- this will only work if the original partition <= target drive
- this is not the case with my current setup and would require a deep cleansing of my C: drive.
After completing any of the selected options, grub2 will need to be updated with the new location of my Windows installation.
I decided to go with Option (2). The reason being, I wanted to start with a clean install of Windows so that I can prune out all the unwanted applications that I have accumulated throughout the years and simply bring over anything important to the new system drive. Furthermore, because of the reduced size of the system drive, I wanted to have some space allocated within the old system drive to hold programs that are of an exceptional size. These were the following steps that were taken:
- Create a Windows 10 installation USB
- download Windows 10 Installation Media tool: https://www.microsoft.com/en-ca/software-download/windows10
- run tool & select create boot media
- wait until process has completed
- Turn PC off
- Put in newly created bootable USB media
- Turn PC on
- should boot straight into the USB
- Go through installation wizard
- choose install (as we don’t want to upgrade current installation but make a new one)
- select the new drive that you wish to use (SSD in my case)
- computer will restart numerous times - don’t remove the USB stick
- @ the end of this, you should have a running Windows OS on the new drive & you should currently have that new Windows instance running
- Install Boot-Repair & burn it to a USB
- An installation of a Boot-Repair disk can be found here: https://sourceforge.net/p/boot-repair-cd
- To burn onto the USB you could use Rufus, installation can be found here: https://rufus.ie
- Restart PC - w/ USB pluged in
- Go to boot menu
- boot into the USB paritition 1
- select the Boot-Repair
- Boot Repair should automatically open
- select ‘Recommended Repair’
- follow the instructions given by copying & pasting commands into the termninal
- Turn off PC
- Everything should be gravy now. It is safe to remove the USB. You can test booting into either OS to ensure your ease of mind.
If everything went smoothly, the result will be a bootable instance of Windows on the desired drive, and the same bootable instance of Linux - Ubuntu in my case - that was there previously. The original drive will still have to be sorted through to extract all the wanted data. It is notable that many system files on the original drive cannot be easily removed. Personally, I would suggest to just go through the partition & extract all wanted data and then delete the partitions that were there previously - C: and the recovery partitions.
Performance Improvement
The two images below are screenshots of CrystalDiskMark on the system drive using the HDD and then the new SSD. In terms of improvement, we have
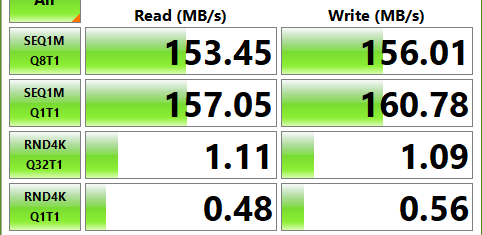
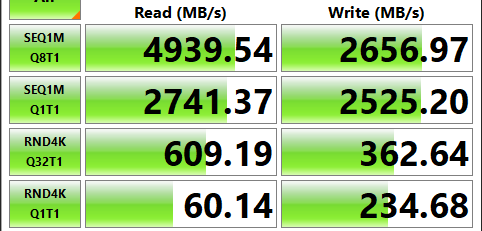
Overall, the following table shows the magnitude of improvement for each category:
| Type | Read (MB/s) | Write (MB/s) |
|---|---|---|
| SEQ1M (Q8T1) | 31.2 x | 16 x |
| SEQ1M (Q1T1) | 16.5 x | 14.7 x |
| RND4K (Q32T1) | 547.8 x | 331.7 x |
| RND4K (Q1T1) | 124.3 x | 418.1 x |
This is a significant improvement and I am excited to notice the differences when working with the SSD.